
Plaatsing van de schoenplaatjes
Een juiste installatie van de schoenplaatjes is essentieel voor de beste pasvorm en prestaties van je Lake schoenen. Het beïnvloedt je trap efficiëntie, comfort en de gezondheid van je gewrichten op lange termijn. Of je nu weg-, mountain- of gravelplaatjes installeert, het is belangrijk om ze zorgvuldig uit te lijnen. Volg onze stapsgewijze handleiding of raadpleeg een bikefitter voor optimale resultaten.
Installatie van 2-bouts MTB-schoenplaatjes
Lake Cycling MTB-schoenen zijn ontworpen voor gebruik met 2-bouts MTB-pedaalsystemen. In sommige gevallen kan de verbinding tussen het schoenplaatje en het pedaal worden belemmerd door verschillen in ontwerp van schoenplaatjes en pedalen tussen merken. Het is belangrijk om schoenplaatjes zorgvuldig te installeren om ervoor te zorgen dat er voldoende ruimte is voor de schoenplaatjes om goed met het pedaal te verbinden, wat zorgt voor een soepele en drukvrije verbinding en pedaalbeweging. Als pedalen niet correct zijn geïnstalleerd en er druk nodig is om ze te verbinden, kan de schoenzool beschadigd raken, wat mogelijk verslechtering of losraken van de rubberen zool kan veroorzaken. Het niet opvolgen van deze instructies voor het controleren van de ruimte voor schoenplaatjes zal elke garantie met betrekking tot zoolschade en/of het losraken van de schoenplaatjeszak ongeldig maken. Pedalen met veerklemmen die op de contactpunten van de schoenzool rusten, moeten worden gebruikt met schoenbeschermers of vulplaten, die meestal door de pedaalfabrikant worden geleverd. Deze beschermers beschermen de zool tegen wrijving en uiteindelijk structurele schade. Pedalen met veerklemmen zijn onder andere van de volgende merken: Crank Brothers®, Look®, Time® en HT®.
Opties voor installatie van schoenplaatjes & Montage Tips
Optie 1: Gebruik schoenplaatjesvulplaten (geleverd door de pedaalfabrikant of apart verkocht) om het schoenplaatje te installeren met een afstand van 0,25–1 mm tussen de onderkant van het schoenplaatje en de schoenzool. De gewenste ruimte tussen het schoenplaatje en de grond moet 0,25–1 mm zijn.
Optie 2: Als er geen schoenplaatjesvulplaat beschikbaar is, trim dan de rubberen noppen om de gewenste 0,25–1 mm ruimte tussen de noppen en de grond te bereiken.
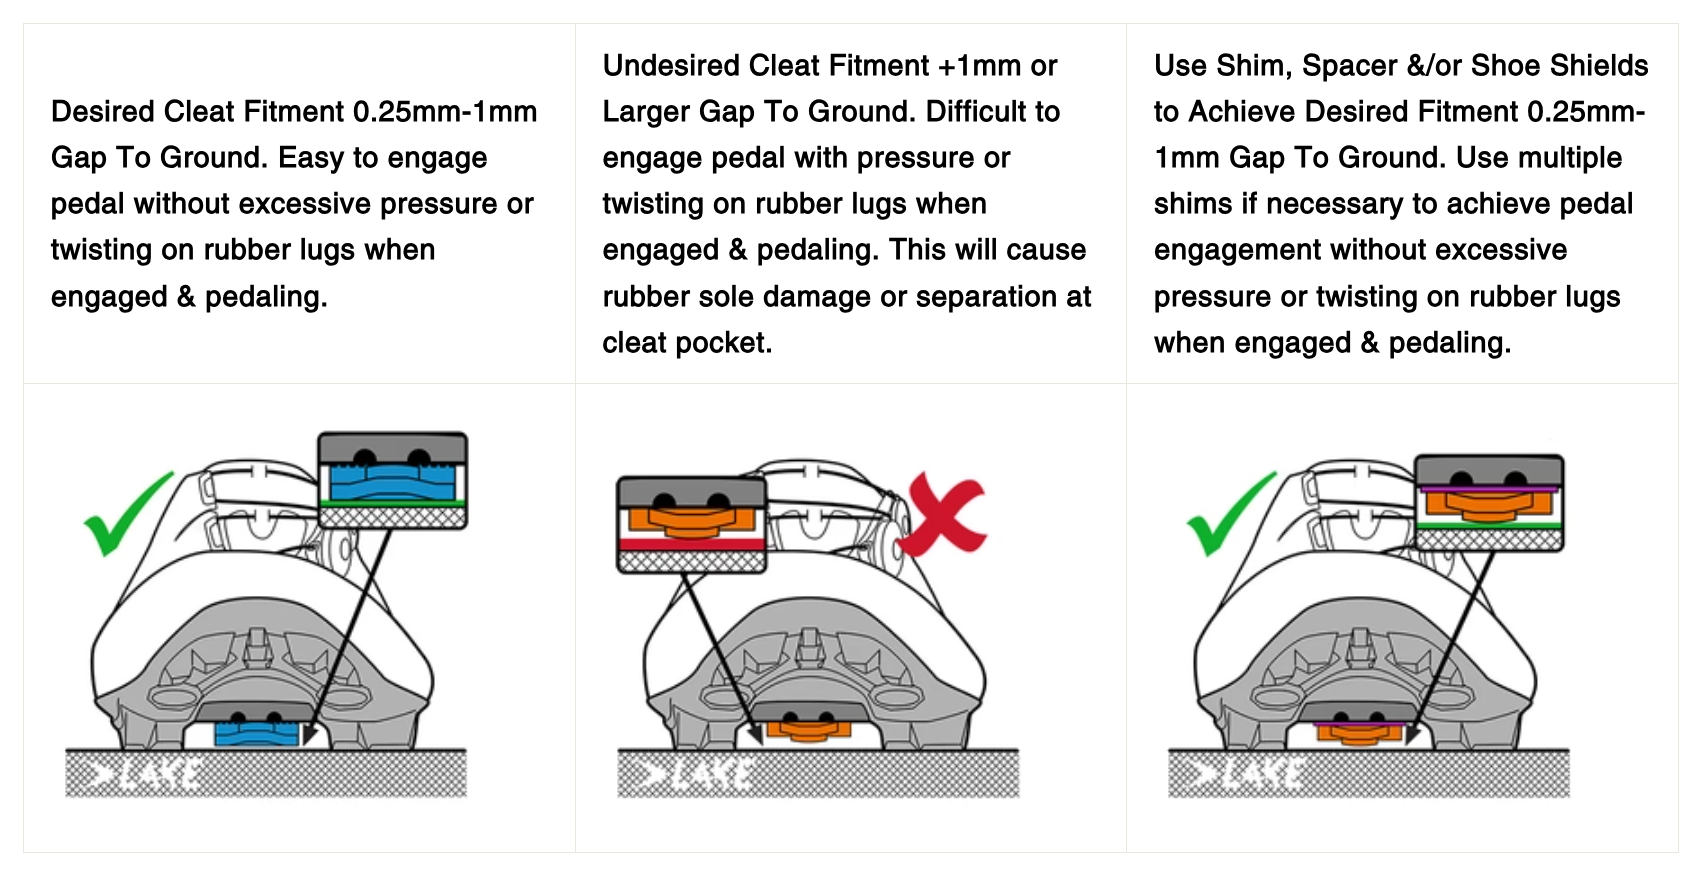
Schoenplaatje Bout Smering: Breng vet aan op de schroefdraad van de schoenplaatjesbout om te voorkomen dat de bouten corroderen, roesten of vastlopen in de schoenplaatmoer.
Draaimoment Schoenplaatjesbout: Elke pedaalfabrikant gebruikt verschillende metaalsoorten en kwaliteiten voor hun bevestigingsmateriaal. Raadpleeg altijd de handleiding van het pedaalmerk voor het meest actuele en correcte draaimoment om te voorkomen dat de schoenplaatjesbout of moer beschadigd raakt.
Veelvoorkomende draaimomenten:
Installatie 3-Bout Racefiets Schoenplaatjes:
Gebruik boutvet en volg het aanbevolen draaimoment van de pedaalfabrikant. Draai alle bouten eerst met de hand vast en draai ze daarna afwisselend aan totdat het gespecificeerde draaimoment is bereikt.
Installatie 4-Bout Racefiets Schoenplaatjes:
Gebruik boutvet en volg het aanbevolen draaimoment van de pedaalfabrikant. Draai alle bouten eerst met de hand vast en draai ze daarna afwisselend aan totdat het gespecificeerde draaimoment is bereikt.
Vervanging van Schoenplaatjes:
Om beschadiging van je fietsschoenen te voorkomen, is het belangrijk om schoenplaatjes te vervangen zodra ze duidelijk versleten zijn. Versleten plaatjes kunnen ervoor zorgen dat het pedaal direct contact maakt met de zool, wat krassen, deuken of zelfs structurele schade kan veroorzaken, vooral bij carbonzolen.
Let op tekenen zoals wiebelen tijdens het vastklikken of zichtbare slijtage aan de randen van het plaatje. Regelmatige controle en tijdige vervanging beschermen je schoenen en zorgen voor optimale pedaalverbinding.
Observatie van Beschadiging:
Waarschijnlijke Oorzaak:
- Door slijtage komt het pedaal dichter bij de zool, waardoor direct contact vaker voorkomt.
- Als de schoen of het plaatje licht wiebelt tijdens het vastklikken, kan het pedaal over de zool schuren.
- Sommige pedalen met brede platforms of scherpe randen kunnen dit effect verergeren als de hoogte van het plaatje door slijtage is afgenomen.
Wat Je Kunt Doen:
- Vervang de schoenplaatjes om de juiste afstand tussen pedaal en zool te herstellen en direct contact te voorkomen.
- Controleer de pedalen op slijtage of scherpe randen die het probleem kunnen verergeren.
- Overweeg het gebruik van plaatjes- of spaceronderleggers als er zelfs met nieuwe schoenplaatjes nog te weinig ruimte is.