Handleiding voor warmtevorming
Je kunt de eerste pasvorm van je hitte-vormbare schoenen een beetje onhandig en zelfs een beetje stressvol vinden. We willen dat je zelfverzekerd bent in het passen en aanpassen. Echter, het hebben van een tweede persoon of een getrainde technicus aanwezig zal de pasvorm het meest nauwkeurig maken.
- Vermijd het gebruik van apparaten zoals haardrogers, heteluchtverfbranders, magnetrons of directe vlammen.
- Gebruik geen stofzuiger voor het vormen.
- Probeer de schoen niet te vormen zonder dat deze aan je voet zit.
- CFC-schoenen worden geleverd met uitneembare inlegzolen en kunnen worden gebruikt met op maat gemaakte orthopedische inlegzolen. Raadpleeg de veelgestelde vragen om de beste optie voor jouw behoeften te vinden voordat je begint met het vormen van je schoenen.
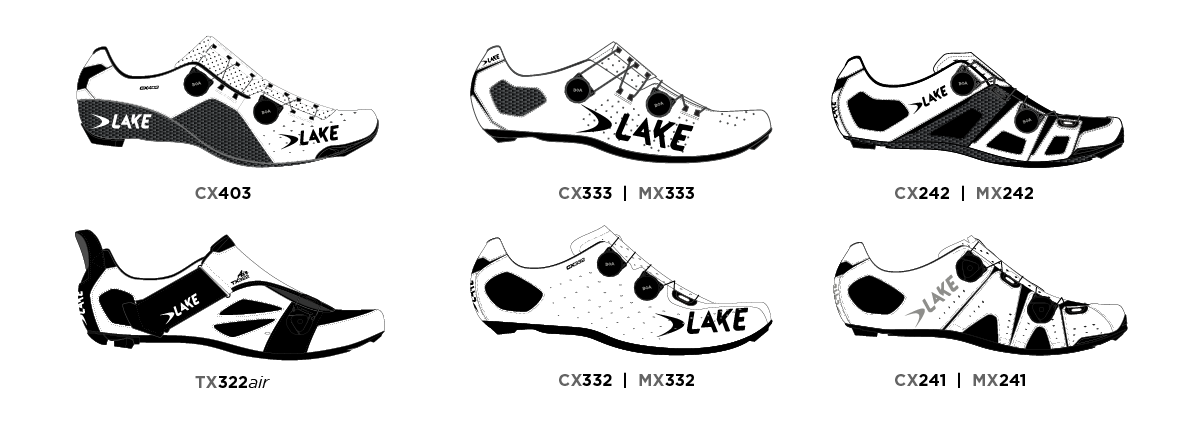
Compatibele modellen
| You will need the following items | |
|
|
Verwarm de oven voor
|
Conventional Oven Pre-heat oven to 200ºF / 90ºC Allow oven to pre-heat for 5–10 minutes |
Convection Oven Set to “bake” and 180ºF / 80ºC Allow oven to pre-heat for 5 minutes |
| For best results, use an oven thermometer | |
Plaats schoen in oven
Draag ovenwanten of hittebestendige handbescherming en plaats één schoen op het ovenrek met de zool direct op het rek.
Laat het lederen materiaal niet het rek of de zijkanten van de oven raken.
Verwijder de binnenzool (optioneel)
|
Conventional Oven Heat shoe for 3–4 minutes |
Convection Oven Heat shoe for 4–5 minutes |
Schoen uit de oven halen
Terwijl je hittebestendige handschoenen draagt, haal je de schoen op het juiste moment uit de oven. Vermijd het vastpakken van de schoen bij de neus, omdat dit de structurele integriteit kan aantasten. Je zou het bovenste deel van de hiel voorzichtig moeten kunnen buigen. Het hielmateriaal moet flexibiliteit vertonen zonder te zacht te worden.
Pas de schoen aan
Zorg ervoor dat het een nauwsluitende, comfortabele pasvorm is, maar niet te strak. Vorm de schoen terwijl je zit naar je voet, zorg ervoor dat er gladde oppervlakken zijn zonder scherpe randen. Vermijd het gebruik van gereedschap dat scherper is dan je vingers, tenzij je een getrainde schoentechnicus bent. Probeer de schoen niet van je voet te drukken of te vormen.
Vermijd overmatig trekken of duwen op het leren bovenwerk. Oefen geen druk uit op de rubberen zool of loopvlakken. Hoewel het veilig is om in de schoenen te staan, kan het uitoefenen van kracht op deze gebieden terwijl ze verwarmd zijn, leiden tot loslating.
Zodra de schoen is afgekoeld en je hem ongeveer vijftien minuten hebt gedragen, controleer of de sluitingsdruk naar wens is en pas deze indien nodig aan.
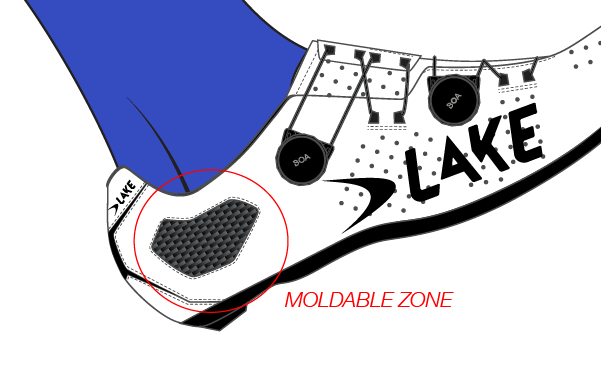
Je hoeft misschien niet zo strak aan te trekken als bij conventionele schoenen, maar als je drukpunten ervaart in het vormbare gebied, verwarm en pas opnieuw aan.
Herhaal bovenstaande stappen voor de andere schoen. Dit geeft je je initiële setup. Vaak is dit alles wat je nodig hebt.
Videotutorial